




































If you’re tired of manually pulling property data or dealing with outdated records, automation can save you time, reduce errors, and improve decision-making. Here’s a quick breakdown of the process:
- Define Your Data Needs: Identify what property data you require (e.g., sale prices, ownership details) and decide how often it needs to be updated.
- Choose Reliable Sources: Use real estate APIs and trusted platforms like BatchData to gather accurate and current information.
- Build a Data Pipeline: Create a system to ingest, process, store, and deliver property data efficiently.
- Ensure Data Quality: Validate, clean, and deduplicate your data to avoid errors and inconsistencies.
- Integrate and Scale: Connect your data to tools like CRMs or dashboards, and track performance to refine your approach.
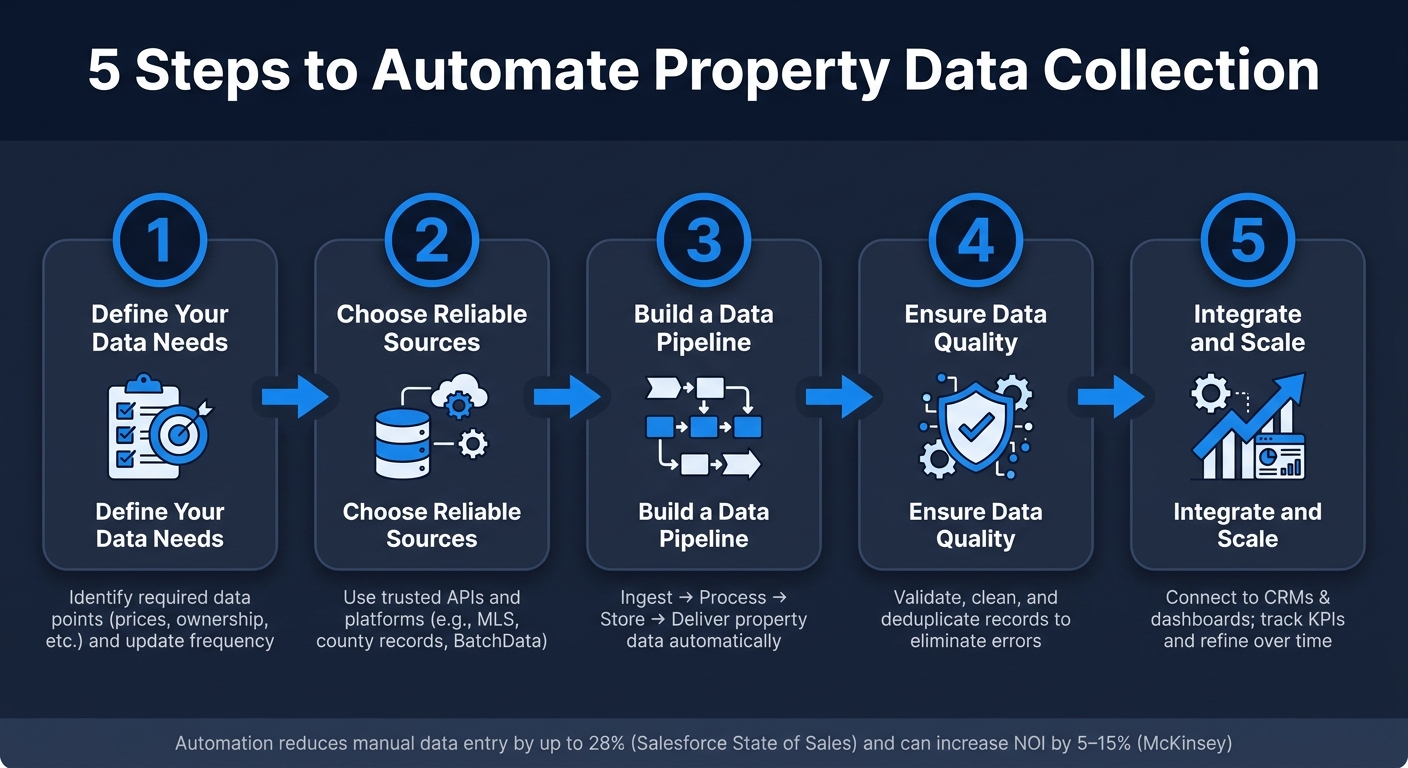
5 Steps to Automate Property Data Collection
Automate Real Estate Data Analysis with AI & n8n|Full Automation Guide 🏡🚀
sbb-itb-8058745
Step 1: Define Your Property Data Needs
Now that we’ve covered the advantages of automation, the first step is to clearly outline your property data requirements. Before diving into coding or connecting APIs, take the time to determine exactly what data you need and why. Skipping this step can lead to wasted resources by collecting irrelevant or excessive information.
Identify Use Cases and Required Data Points
Begin by linking your data needs to a specific business goal. Different teams often require entirely different types of data. For instance, an acquisitions team searching for pre-foreclosure properties in cities like Dallas or Tampa will need different information than a lending team evaluating collateral risks. Here are some common real estate use cases and their associated data needs:
| Objective | Required Data Points | Update Frequency |
|---|---|---|
| Acquisitions & Valuation | Sale price, APN, square footage, floor plans, condition | Static / Per transaction |
| Marketing & Leasing | Competitor pricing, listing status, regional rental trends | Weekly / Monthly |
| Risk & Maintenance | HVAC status, water leak alerts, energy usage | Real-time / Daily |
| Financial Oversight | Rent payment history, expense tracking, tax records | Monthly |
By tying your objectives to specific data points, you ensure that your pipeline gathers only the essential information. This helps create a streamlined foundation for the automation process.
Set Data Standards and Schema
After defining your data needs, the next step is deciding how to structure it. While this might not seem as exciting as building the data pipeline, it’s a critical step for ensuring long-term stability.
Standardizing your data – such as using USPS address formats, MM/DD/YYYY for dates, or USD for currency – helps avoid issues when combining data from various sources, like county assessors. Many in the industry are adopting frameworks like the Uniform Property Dataset (UPD) to ensure consistency. This is particularly important for lenders and appraisers who rely on third-party-verified data. Once your standards are in place, you can shift your focus to keeping the data relevant with proper update schedules.
Prioritize Data Freshness and Update Frequency
After defining and structuring your data, the next priority is ensuring it’s updated regularly. The frequency of updates can significantly impact the effectiveness of your automated pipeline. Some property data points, such as year built or square footage, rarely change and may only need to be captured once per transaction. On the other hand, dynamic data – like listing status, rent payment trends, or energy usage – can change frequently, and outdated information can lead to missed opportunities.
Here’s a general rule of thumb: if outdated data could impact a business decision, it needs frequent updates. For example, the listing status of a property being considered for acquisition should be refreshed weekly, while the year of construction might remain static for decades. By tailoring update frequencies to the nature of the data, you can optimize API calls and resource use, keeping your pipeline efficient as you scale up.
Step 2: Choose Data Sources and APIs
Once you’ve outlined your data requirements, the next step is finding trustworthy sources and APIs that can scale as your needs grow.
Evaluate Internal and External Data Sources
Real estate businesses often hold a wealth of internal data. CRM platforms like Salesforce or HubSpot store information on leads, contact histories, and deal progress. Property management systems track details like rent rolls, lease terms, and occupancy rates. Meanwhile, transaction systems log critical data such as closing dates, purchase prices, and fees. While these internal tools are useful, they often lack complete property details or verified owner contacts. That’s where external sources step in to fill the gaps.
| Source Type | What It Provides | Main Constraint |
|---|---|---|
| MLS/IDX feeds | Active listings, list prices, days on market, status changes | Requires board membership; licensing restrictions |
| County assessor/recorder | Legal ownership, APN, assessed value, recorded sales, liens | Update delays; inconsistent formats across 3,000+ counties |
| Third-party providers (e.g., BatchData) | Normalized property attributes, ownership, skip-traced contacts | Additional cost; data freshness depends on provider updates |
Because public records are often fragmented and inconsistent, using aggregators is crucial for a complete picture.
Use BatchData for Property and Contact Data
BatchData is designed to address the limitations of internal systems and raw public records. Its API delivers three main benefits: property data enrichment, contact enrichment with skip tracing, and bulk data delivery.
For property data, BatchData’s API provides standardized details like bed/bath counts, square footage, year built, lot size, property type, and ownership information. You can search by address, coordinates, or owner name, making it ideal for real-time workflows. This allows you to instantly retrieve property details and verified contact information, enabling more personalized follow-ups. For off-market campaigns, BatchData offers bulk delivery. You can submit a list of target parcels or zip codes and receive a file with normalized property data, along with skip-traced owner phone numbers and emails. This data is CRM-ready and can be imported directly into your dialing system.
Public records, like county data, often lack contact details such as phone numbers or emails. Skip-tracing APIs like BatchData fill this gap by matching owner names against consumer and telecom databases to append actionable contact information. For ongoing portfolio updates, BatchData supports nightly or weekly API calls to refresh contact details and flag changes, such as new mailing addresses or phone numbers.
Assess API Capabilities and Integration Options
Choosing the right real estate API is about more than just data accuracy – it’s about ensuring it can grow with your business. Before committing to a provider, consider these factors:
- Coverage: Confirm that the provider covers your target areas, including specific states, counties, and property types like residential, multifamily, commercial, or land. Request coverage stats or sample data to verify.
- Update frequency: Ensure the provider’s data refresh schedule aligns with your needs. For example, MLS listing statuses may update hourly, while tax assessment data might only refresh monthly. Misaligned update cycles can disrupt your pipeline.
- Endpoints: Look for REST/JSON APIs that support searches by address, APN, owner name, and bulk enrichment. For higher volumes, check if they offer SFTP or cloud delivery options (e.g., AWS S3 or GCS) in addition to API calls.
- Authentication and security: Confirm that authentication options like API keys or OAuth 2.0 meet your security standards.
- Rate limits and SLAs: Ensure the API can handle your volume, whether you’re running thousands of nightly refresh calls or enriching leads in real time. Look for uptime guarantees of 99.9% or higher and a status page to monitor performance.
Recent trends highlight growing investments in data integration and scalable API solutions, making this evaluation step even more critical.
Once you’ve selected your data sources and APIs, you’re ready to build a seamless data pipeline that ties everything together efficiently.
Step 3: Build and Integrate Your Data Pipeline
Now that you’ve selected your data sources and APIs, it’s time to create an automated pipeline. This pipeline will handle everything – ingesting, processing, storing, and delivering property data to the right places.
Design an End-to-End Data Workflow
A property data pipeline typically includes four main stages: ingestion, processing, storage, and delivery. Here’s how it works:
- Ingestion: Data is pulled on a schedule or triggered by specific events. For example, you might schedule API calls or set up event triggers to refresh property data.
- Processing: This step standardizes and enriches the raw data. For instance, you could format addresses to meet USPS standards, convert lot sizes into square feet, or flag distressed properties based on equity or tax delinquency.
- Storage: Once cleaned, the data is stored in a central system, often a cloud data warehouse. Organize it into tables for properties, owners, transactions, and leads.
- Delivery: Finally, the data is sent to the right tools or people. This could mean updating CRM queues for acquisition reps, pre-filling deal records for underwriters, or populating dashboards for asset managers.
Before you start coding, take time to plan. Use tools like Lucidchart or Miro to sketch a data flow diagram. Define key details like event triggers, schedules, and SLA requirements (e.g., “new property matches must be available by 8:00 a.m. ET daily”). A clear plan upfront can save you from headaches later, especially when scaling to new markets or adding more data sources.
Standardize Data Models and Identifiers
One common issue with data pipelines is inconsistent identifiers. Different sources – such as county records, MLS feeds, or API responses – often describe the same property in different ways. To avoid duplicate records and mismatched data, build your pipeline around these three identifiers:
- Normalized APN: Combine the parcel number with the county FIPS code (e.g., “06037-1234567890”) to eliminate cross-county confusion.
- USPS-Compliant Address: Standardize addresses by removing punctuation, expanding abbreviations (e.g., “St” becomes “Street”), and storing a lowercase version for easier matching.
- Internal Surrogate Key: Generate a unique identifier (UUID) to serve as your master property key.
With these standardized identifiers in place, you can confidently integrate APIs without worrying about mismatched data or broken joins.
Integrate BatchData into Your Pipeline
BatchData is a powerful tool for both real-time data enrichment and bulk data processing. Here’s how you can use it effectively:
- Real-Time Enrichment: Trigger BatchData’s property search API when a new lead is added. This API will append enriched details like bed/bath counts, square footage, year built, ownership info, and verified contact details via skip tracing. Store this enriched data in your warehouse and sync it with your CRM, ensuring your acquisition team has fully populated lead records without extra manual work.
- Bulk Data Processing: For larger workflows, submit lists of target parcels or ZIP codes to BatchData’s bulk delivery endpoint. This will return a normalized file with property data and skip-traced contacts. Import this file directly into your dialing system or marketing platform. To keep your data fresh, schedule regular API calls (daily or weekly) to update contact details, mailing addresses, phone numbers, or recent sales activity.
Step 4: Set Up Data Quality Checks and Governance
Even the most carefully designed pipeline can encounter errors – things like incorrect addresses, disconnected phone numbers, or duplicate records. To prevent these issues from snowballing, it’s crucial to build active quality controls into your process.
Automate Data Validation and Normalization
The best time to catch data errors is right at the start – during ingestion. By setting up field validations in your ETL/ELT tool, you can ensure key fields like street address, city, state, and ZIP Code aren’t left empty. For example, enforce USPS-standard state abbreviations (like “CA” instead of “Calif.”) and check that ZIP Codes follow the proper format, whether it’s the basic 5-digit code (e.g., 94103) or the extended ZIP+4 version (e.g., 94103-1234).
Phone numbers can be cleaned up by removing non-digit characters, standardizing to a 10-digit format, and converting them to the E.164 international format (e.g., +1XXXXXXXXXX). Tools like BatchData’s phone verification system can even confirm if a number is active and identify its type – whether it’s a mobile, landline, or VoIP number. This information can help you fine-tune your dialer settings and stay compliant.
To stay ahead of potential issues, set up alerts for anomalies. For instance, trigger a Slack or email notification if more than 5% of addresses fail USPS validation or if null parcel IDs exceed the 7-day average. Once the data passes these checks, move on to deduplication to ensure each record is one of a kind.
Deduplicate Data
Duplicate records can be a major drain on resources, especially in real estate pipelines. By consolidating duplicates, you could cut marketing costs by 10–20% and see campaign response rates improve by 5–10%. Start with deterministic matching – looking for exact matches on fields like APN (Assessor’s Parcel Number), county, and state. Then, use fuzzy matching techniques like Jaro-Winkler scoring to catch near-duplicates, such as “123 Main St” versus “123 Main Street” or slight name variations like “Jon Smith” and “John Smith.” Set a threshold score of 0.90 or higher, and send borderline cases to a review queue instead of merging them automatically.
When merging records, aim to create a single, reliable version by combining the best data from all sources. For example, prioritize county assessor data for ownership details but rely on BatchData’s enriched contact information for the most up-to-date phone numbers. Use a clear survivorship rule – like “most recently verified phone wins” – and maintain detailed logs so you can trace how each record was created or undo changes if needed.
Set Governance and Compliance Policies
Once your data is cleaned and validated, the next step is to establish governance practices that ensure its long-term reliability. Strong governance also helps you stay compliant with regulations like TCPA, CAN-SPAM, and CCPA/CPRA.
Start by assigning clear responsibilities. Designate a data owner (such as the Head of Data) and data stewards for specific datasets, like property and contact information. These individuals should oversee schema updates, enforce quality standards, and resolve conflicts when data sources provide contradictory information.
On the compliance front, managing U.S. property and contact data comes with its share of legal obligations. For example, the TCPA requires documented consent before using autodialers or prerecorded messages for wireless numbers. Similarly, CAN-SPAM mandates that emails include accurate sender details and an opt-out option. In California, the CCPA/CPRA requires honoring consumer requests to access, delete, or opt out of the sale of their personal information. Other states, including Colorado, Virginia, Connecticut, and Utah, have similar laws.
To safeguard sensitive data, implement role-based access controls (RBAC) in your data warehouse and BI tools, limiting who can view or edit certain information. Establish retention policies to automatically delete or anonymize records after a set period, reducing both risk and storage costs.
Step 5: Put Automation to Work and Scale It
With your pipeline now delivering validated and well-governed data, it’s time to transform that data into actionable insights. This means making faster decisions, improving outreach strategies, and achieving measurable results.
Connect Data to Analytics and Reporting
Feed your automated property data into a central data warehouse like Snowflake, BigQuery, or Redshift, and connect it to a BI tool such as Tableau, Power BI, or Looker. From there, you can create three essential dashboards:
- Acquisition Funnel: Track leads, offers, and closed deals by market and property type.
- Underwriting Performance View: Compare modeled property values, such as AVMs, against actual sale prices.
- Portfolio Scorecard: Monitor metrics like occupancy rates, rent growth, and vacancy turn times by asset.
Set these dashboards to refresh hourly or daily, ensuring decision-makers always work with the most up-to-date data – not outdated spreadsheets.
For underwriting, use APIs to automatically populate key details like building characteristics, tax assessments, and recent sales comps into your templates. This way, underwriters can focus on fine-tuning assumptions rather than manually re-entering data. The result? Faster deal research and more consistent results across markets.
According to McKinsey, embedding analytics into operations can increase NOI by 5–15% through better pricing, improved tenant retention, and streamlined operations.
These automated insights lay the groundwork for seamlessly integrating automation into daily workflows.
Embed Automation into Daily Workflows
Integrate your enriched data into the tools your team already uses. For instance, in your CRM – whether it’s Salesforce, HubSpot, or Follow Up Boss – automatically enrich new leads with details like property type, estimated value, equity band, and owner contactability. Leads with high equity or long ownership tenure can be routed to senior reps, while lower-priority leads enter nurture sequences. Platforms like BatchData make this enrichment process straightforward, giving your team immediate access to actionable information.
You can also schedule API pulls to update property values and market rents automatically. Set up alerts for key thresholds, such as when market rents exceed current rents by more than 10% or when a property’s modeled loan-to-value (LTV) ratio surpasses your risk limits. These alerts can trigger tasks in tools like Asana or Monday.com, helping asset managers stay ahead of potential issues.
Salesforce’s State of Sales report highlights that sales reps using automation spend 28% less time on manual data entry and administrative tasks compared to their less automated counterparts.
Once automation is integrated into your workflow, tracking its performance becomes the next priority.
Track Results and Improve Over Time
To measure the impact of automation, focus on three key areas:
- Data Quality: Track the percentage of records with complete owner details (name, phone, email) and property attributes.
- Operational Efficiency: Measure hours saved on manual tasks and the time it takes to contact new leads.
- Business Outcomes: Monitor lead-to-deal conversion rates, NOI growth, and reductions in missed follow-ups.
Establish baseline metrics before implementing automation. Then, schedule quarterly reviews with your acquisitions, operations, and asset management teams to identify areas where automation might be underperforming. For example, if BatchData improves your contactability rate (valid phone or email) from 40% to 70%, you should see an increase in outreach success and closed deals without raising your marketing budget. When you adjust scoring weights or alert thresholds, document those changes and compare pre- and post-adjustment KPIs to ensure progress.
By consistently tracking these metrics, you’ll reinforce the efficiency and strategic benefits of automation.
| Area | Example Automation Use Case | Key Metrics to Track |
|---|---|---|
| Analytics & Reporting | Auto-refresh acquisition & portfolio dashboards | Dashboard refresh latency; % of decisions using current data |
| Underwriting | Auto-populate comps & property attributes via API | Time to underwrite; variance between assumed & actual values |
| Lead Management | Auto-enrich and score inbound property owner leads | Time-to-contact; lead-to-deal conversion rate |
| Portfolio Monitoring | Alerts on occupancy, collections, or market shifts | Number of actionable alerts; response time |
| Outreach & Marketing | Target lists based on ownership tenure, equity, and location | Campaign response rates; cost per acquisition |
Conclusion
Automating property data collection can completely reshape how your workflow operates. By following the five steps outlined – defining your data needs, selecting trustworthy real estate data providers and APIs, building a connected pipeline, ensuring data quality, and integrating everything into your daily processes – you can create a system that works efficiently and grows with your needs.
The real magic happens when these steps come together as a unified system. A clear schema simplifies pipeline integration, while robust validation rules ensure your reports are accurate and actionable. This means your team can spend less time chasing data and more time using it to drive decisions.
Start small – perhaps with a single county or property type – and expand gradually as your data processes become more refined. This cautious approach minimizes risks and helps show value early on, setting the stage for broader adoption across different markets.
Tools like BatchData can make this journey easier. Their APIs deliver structured property and contact data specifically designed for real estate workflows, solving one of the toughest parts of building a custom pipeline.
As you grow, keep in mind that automation is an ongoing process. Regularly evaluate your data sources, update your validation methods, and fine-tune your integrations to keep up with your business’s evolution. The goal isn’t to get everything perfect right away – it’s to build a system that improves over time.
FAQs
What property data should I automate first?
Automate essential property details such as ownership history, sale prices, tax assessments, and market trends. These critical data points transform raw property information into useful insights, helping with faster research, precise client information, and speedier deal closures. Prioritizing this initial layer simplifies decision-making and improves overall efficiency.
How often should my property data be refreshed?
The timing for updating property data largely hinges on your specific needs and the kind of information you’re working with. For instance, real estate platforms typically update their data either daily or weekly to maintain accuracy in areas like pricing, availability, and listings. If you’re using automated workflows powered by APIs, you can tailor the update frequency to suit your business requirements – whether that’s daily, weekly, or even real-time. This approach ensures your data stays both up-to-date and dependable.
What’s the best way to prevent duplicate property records?
To keep duplicate property records at bay during automation, rely on tools equipped with duplicate detection features. These tools can spot and flag duplicates before they’re added to your system. For optimal efficiency, incorporate real-time checks into your workflows. This involves searching for existing entries using key identifiers, helping you steer clear of redundant records.