






































The short answer: I would not pick a skip tracing API based on a posted match rate or a low price. I would test 500 to 1,000 U.S. records from my own file, run the same requests through each vendor, and score them on match quality, latency, docs, compliance, workflow fit, and cost per usable contact.
That matters because a cheap API can turn into a costly one if too many records are wrong, stale, blocked by compliance flags, or hard to push into my CRM and dialer. And a vendor with a high claimed match rate may still do poorly on my counties, my property mix, and my turnaround window.
Here’s what I’d check first:
- Match quality: Is the contact the right person tied to the right property?
- Latency: What do median, p95, and p99 response times look like?
- Docs and setup: Can a developer get working fast with the docs alone?
- Cost per usable contact: Total spend divided by contacts I can actually use
- Compliance: Are DNC, TCPA, litigator, and deceased flags inline?
- Workflow fit: Does it work with my CRM, dialer, batch jobs, and pipelines?
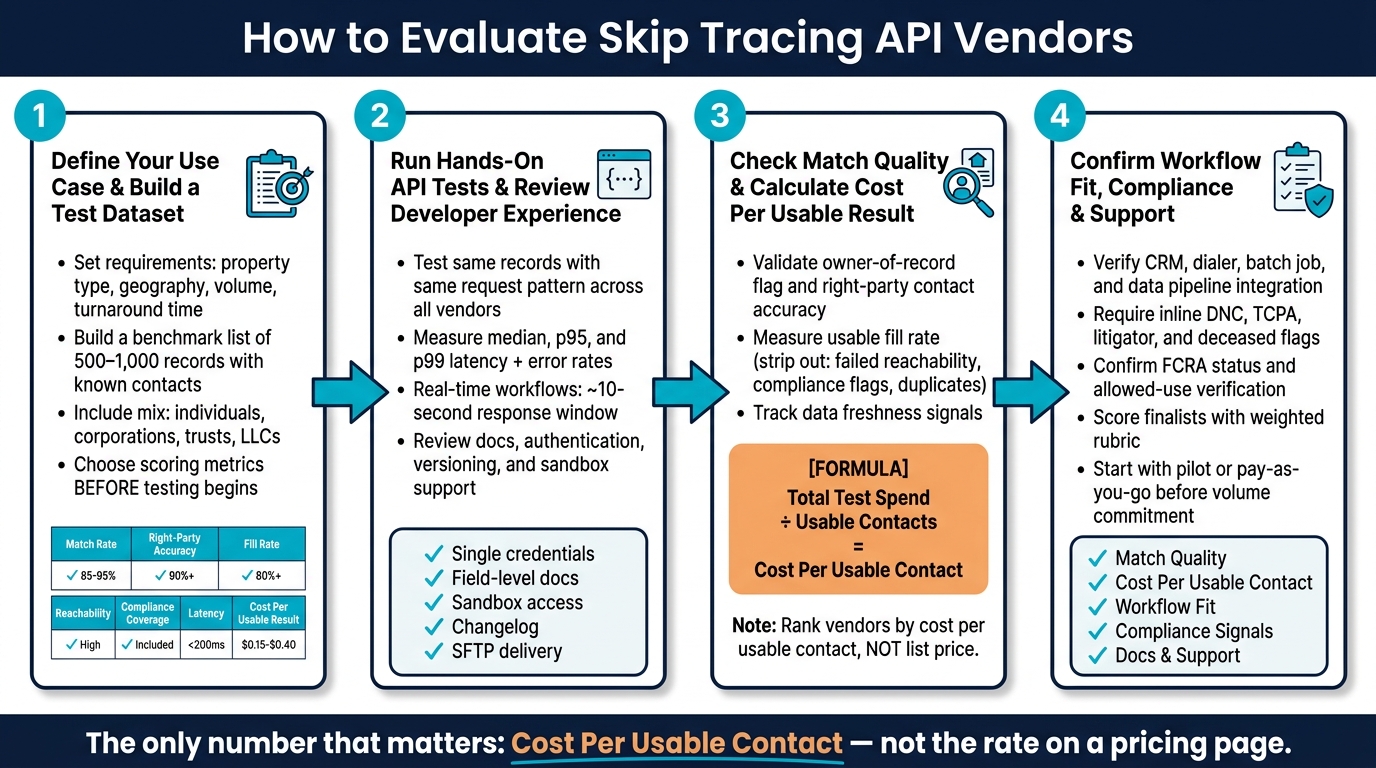
How to Evaluate Skip Tracing API Vendors: A 4-Step Framework
Quick comparison
| What I evaluate | What I look for |
|---|---|
| Match quality | Right-party contact accuracy, owner link, reachability |
| Speed | Median, p95, p99 latency, plus error rates |
| Developer experience | Docs, auth, sandbox, versioning, status page |
| Cost | $ per matched and usable contact, not list price |
| Compliance | Inline suppression and allowed-use checks |
| Workflow fit | Real-time API, batch support, SFTP, field mapping |
If I had to boil the whole process down to one rule, it would be this: judge vendors by usable output in my workflow, not by sales claims.
sbb-itb-8058745
1. Define Your Use Case and Build a U.S. Test Dataset
Before you send a single API request, get clear on what “good” means for your team. Write down the requirements first. If you skip that step, it’s easy to compare vendors on the wrong criteria and end up with a result that looks neat on paper but doesn’t help in practice.
Set Requirements for Property Type, Geography, Volume, and Turnaround Time
Start with the property types your team deals with day to day: single-family, multifamily, commercial, or vacant land. If you test against the wrong mix, the outcome won’t tell you much.
Then define your target geography. If your team works in certain ZIP codes, counties, or states, your test file should mirror that footprint.
You’ll also want to set two operating requirements up front: monthly record volume and turnaround time. Those two factors shape what kind of API setup you need.
If your call center handles inbound leads in real time, you need a synchronous endpoint that can respond within a 10-second window. If you’re processing large batches, an asynchronous endpoint makes more sense. These setups are not interchangeable. Pick the wrong one, and you can create headaches even if the match quality looks good.
Build a Benchmark List of 500 to 1,000 Records With Known Contacts
Your benchmark file is the main tool in this review. Pull 500 to 1,000 records from your CRM, call history, or property database where you already know, or can confirm, the owner contact. The point is simple: compare each vendor’s output against information you know is correct.
Make sure the file includes both easy and hard records. A clean sample can make almost any vendor look better than they are.
"A number captured on a live inbound call and a number scraped off a form fill three years ago are not the same input. Publishing a single average would be telling most customers something untrue about their own file."
- Ivo Draginov, President and Co-founder, BatchData
Include a mix of ownership structures, such as:
- Individuals
- Corporations
- Trusts
- LLCs
If your workflow includes reverse lookups, where you start with a phone number or email instead of a name and address, add a subset of those records too.
Choose Scoring Metrics Before Testing Begins
Set your scoring rules before the results come back. If you change what counts as a “match” halfway through, you’re tilting the test.
Here are the core metrics to track across every vendor:
| Metric | What to Measure |
|---|---|
| Match Rate | Percentage of inputs that resolve to a verified identity |
| Right-Party Contact Accuracy | Whether the returned contact is actually the correct person |
| Fill Rate by Field | Completeness across identity, phone, email, and property fields |
| Reachability | Active signals for phone line type, carrier, and email deliverability |
| Compliance Coverage | Presence of DNC, TCPA, litigator, and deceased flags |
| Latency | Median and p95 response time under your expected request pattern |
| Cost Per Usable Result | Total test spend divided by matched, reachable, compliant results |
Not every team should score these the same way. A call center will care most about latency and DNC/TCPA compliance signals. Acquisitions and wholesaling teams will care more about linked property context. Data and CRM teams usually lean harder on fill rate and identity resolution.
Set those weights before testing starts. That way, the final score reflects your workflow instead of whoever happened to look best in one narrow area.
2. Run Hands-On API Tests and Review Developer Experience
With your benchmark in place, run the same test for each vendor.
Test the Same Records With the Same Request Pattern
Use the same sample set, the same payload format, and the same logging rules across every vendor. Change the sample, timing, or logging method, and you lose a clean apples-to-apples comparison.
Check how each API handles both single-record lookups and batch requests. Some APIs take up to 100 inputs in one call and return ranked matches for each lookup. That can cut down on round trips when you’re working through large files. Log the billing model at this stage too, so you can figure out cost per usable result later. Some vendors charge per API call, while others bill only for matched records.
After that, look at speed and stability at the volume you expect to send.
Measure Median, p95, and p99 Latency Along With Error Rates
Track median, p95, and p99. Skip plain averages. Median latency shows what most requests feel like. p95 and p99 show what happens when slower responses start piling up.
For real-time inbound workflows, timing gets tight fast. Live workflows often have only about 10 seconds to route a lead. For batch jobs, the main question is throughput over time and whether the API still holds up under load. Track error rates next to latency, and check how the API responds to rate limiting during traffic spikes.
Review Docs, Authentication, Versioning, and Sandbox Support
Once the API is fast enough, test how easy it is to work with. A fast API that’s painful to integrate can still drain time. A simple way to check: ask a developer to build a request from scratch using only the docs.
Look for a dedicated developer portal with field-level docs, real request and response examples, and plain guidance on error codes. Check whether the vendor uses one set of credentials across its endpoints. Also verify that the vendor keeps a changelog, offers a public status page, and provides sandbox access so your team can test without spending live credits.
| Evaluation Area | What to Look For |
|---|---|
| Authentication | Single set of credentials across all API products |
| Documentation | Field-level detail, JSON examples, dedicated developer portal |
| Sandbox Access | Test environment available before committing to a paid plan |
| Versioning | Clear changelog and backward-compatibility policy |
| Delivery Options | REST API plus SFTP or bulk delivery for teams with limited dev capacity |
If your team is short on developer bandwidth, managed SFTP delivery in CSV, JSON, or Parquet can cut integration time.
3. Check Match Quality and Calculate Cost Per Usable Result
Once the API is up and running, the next step is simple: find out whether the results are usable. Your benchmark file is the yardstick here. Use it to check whether returned contacts are current, reachable, and actually tied to the property.
Validate Owner Match Quality and Right-Party Contact Accuracy
As you review results from your benchmark set, check whether each vendor includes an owner-of-record flag that shows the contact is the current legal owner of the property. Then look at how that vendor handles record matching. If a phone number has been shared or reassigned, the better move is to return ranked matches instead of one shaky answer.
It also helps to break results out by state, property type, and the age of the input data. That makes it easier to spot where accuracy stays steady and where it starts to slip. Stick with the same sample records from your benchmark file so the comparison stays apples-to-apples.
| Metric | Verification Method | Purpose |
|---|---|---|
| Identity Match | Name, aliases, DOB, owner-of-record flag | Confirms the correct target |
| Property Link | Situs address, mailing address, property ID | Ties the person to a specific asset |
| Phone Reachability | Line type, carrier, reachability signals | Determines if the number can receive calls/texts |
| Email Validity | Deliverability testing | Reduces bounce rates in outreach |
| Compliance | Compliance flags | Mitigates legal risk and wasted effort |
Measure Fill Rate, Data Freshness, and Disconnected or Duplicate Results
Focus on usable fill rate, not raw fill rate. There’s a big difference.
Strip out results that:
- fail reachability checks
- fail email deliverability testing
- include compliance flags
- show up as duplicates
What remains is the share of records your team can actually use. That’s the number that matters. Also, track freshness signals instead of looking only at whether a record exists in the database.
Convert Test Spend Into Cost Per Usable Contact
Use this formula: total test spend ÷ number of usable contacts. Don’t divide by total matches returned. Divide by the contacts that passed reachability, compliance, and owner-verification filters.
Billing setup can swing this number a lot. BatchData’s Reverse Skip Trace API, for example, is metered by matched person records; lookups that find no matches are not billed.
Rank vendors by cost per usable contact, not by list price alone. A cheaper-looking option can end up costing more once you factor in a weaker match rate or a bigger pile of disconnected numbers. Use this usable-cost score to sort your finalists before you move on to workflow fit and approval needs.
4. Confirm Workflow Fit, Compliance, and Support Before Final Approval
Verify Integration Fit for CRM, Dialers, Batch Jobs, and Data Pipelines
Once you’ve ranked vendors by usable cost, the next step is simple: make sure the API actually fits the way your team works.
Check that each vendor can plug into your CRM, dialer, and data pipeline without a bunch of extra cleanup. The output format should match what your stack already takes in. If your team uses AI agents, confirm whether the vendor supports MCP too.
| Integration Need | What to Verify |
|---|---|
| Real-time enrichment | Synchronous RESTful JSON endpoints |
| Batch processing | Asynchronous endpoints + SFTP delivery |
| CRM/database mapping | Structured JSON with consistent field names |
| AI agent access | MCP server support |
| Dialer safety | Inline compliance flags before dial |
This part matters more than it may seem. A vendor can look good on price, then create a mess once the data hits your systems. If field names drift, delivery formats change, or batch jobs need manual fixes, the cheap option stops looking cheap fast.
Review DNC, Privacy, Security, and Audit Requirements
You’ll also want compliance checks built into the same response. Require inline DNC, TCPA, litigator, and deceased flags so suppression happens before a number gets dialed.
"Compliance signals ship with the record… Suppression happens before an agent hits dial rather than after." – BatchData
Also confirm whether those flags are included in the base price or if they come through a separate scrubbing service. That detail can change your actual cost pretty quickly.
On the legal side, verify FCRA status and make sure your intended use is allowed. Skip tracing output cannot be used for credit, insurance, employment, or housing decisions .
Before final sign-off, check a few nuts-and-bolts items too:
- Secure authentication
- Onboarding help
- Issue escalation path
- Uptime commitments
Those details can save a lot of headaches later.
Score the Finalists and Start With a Pilot Agreement
After compliance is cleared, score the finalists with a weighted rubric based on what you saw in testing.
| Scoring Category | What to Measure |
|---|---|
| Match quality | Usable fill rate, right-party contact accuracy |
| Cost per usable contact | Test spend ÷ contacts passing all filters |
| Workflow fit | CRM mapping, batch support, delivery formats |
| Compliance signals | Inline DNC, TCPA, litigator, deceased flags |
| Docs, support, and SLAs | Sandbox quality, escalation path, uptime terms |
Then start with a pilot agreement or pay-as-you-go terms before you sign any volume commitment. The point of the pilot is to check live-data performance in normal use, not just in a test file. If a vendor performs well in a controlled sample but falls apart in production, you want to know that before you lock in volume terms.
Conclusion: Choose the Vendor That Performs Best in Your Actual Workflow
Use your benchmark data, hands-on tests, cost-per-contact math, and workflow checks to pick the vendor that works best in practice. That’s how you replace sales claims with numbers you’ve checked yourself.
A low price doesn’t mean much if the match rate on your actual records is weak, or if compliance signals are missing and you end up adding a second scrubbing step. The number that matters is cost per usable contact – not the rate on a pricing page.
As Ivo Draginov notes, performance depends on your data, not a published average.
Run your 500–1,000 record sample. Score match quality, latency, inline compliance signals, and integration fit with a weighted rubric. Then start with a pilot or pay-as-you-go terms before signing any volume contract. Pick the vendor that wins on your records, in your workflow, and under your compliance rules.
FAQs
How long should a vendor pilot last?
Long enough to run a batch of your own sample records from start to finish and check stability, not just a one-time test.
Use a fixed sample file in your actual workflow. Then measure match quality, latency, and cost per result across several runs. If the results and performance stay steady on your data, you’re ready to sign.
What if I don’t have 500 records to test?
You can still test BatchData with a smaller sample file of phone numbers or email addresses, then compare the matches against your own data.
If you’re checking the API, you can ask for counts and aggregate metrics instead of full records. That gives you a simple way to test your matching setup before you run larger volumes. And if you want to check volume first, pay-as-you-go pricing is available.
How should I weigh the scoring categories?
Base your scoring on your business needs, not some black-box vendor score you can’t inspect. Put vendors first when they show the raw data and explain the match logic. That gives you room to decide what a high-quality result looks like for your workflow.
Focus on the metrics that hit day-to-day operations the hardest, such as:
- Customizable matching settings
- Depth of returned attributes
- Compliance signals like DNC and TCPA flags for internal processes
That way, you’re not judging a tool by a vague score. You’re judging it by the data and rules your team will actually use.