

Make.com simplifies automating real estate workflows without coding. This guide explains how to integrate real estate APIs, like BatchData, to automate tasks such as wholesale lead generation, property data retrieval, and skip tracing. Here’s a quick overview:
- Set up Make.com and BatchData accounts: Get an API key and understand BatchData endpoints.
- Create a scenario in Make.com: Use modules to design workflows.
- Connect BatchData API: Authenticate and configure API calls.
- Map inputs and outputs: Ensure data flows smoothly between modules.
- Test and activate: Verify connections and automate your workflows.
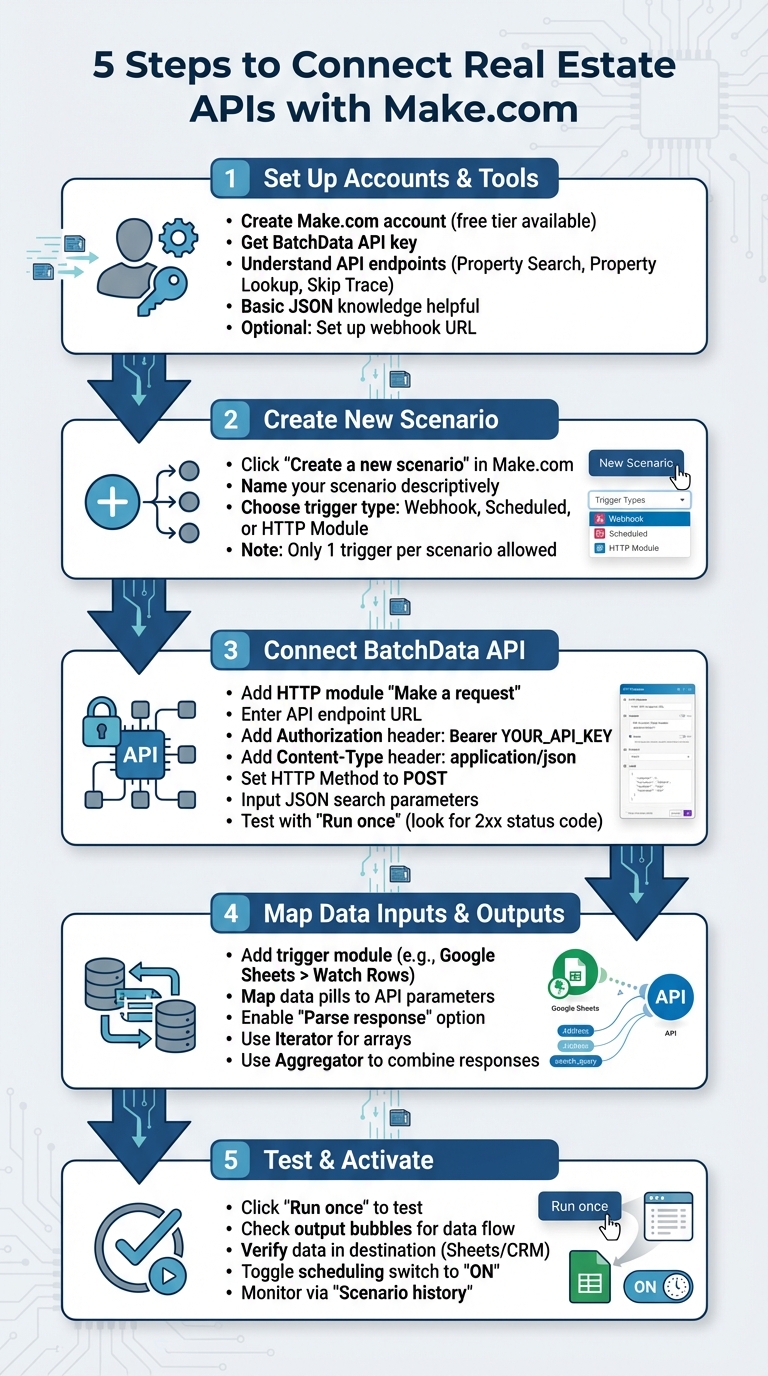
5 Steps to Connect Real Estate APIs with Make.com
How to Connect Any API To Make.com
sbb-itb-8058745
What You Need Before Starting
To make the most of Make.com’s automation tools, it’s important to have a few things ready before diving in. Preparing these essentials ahead of time will help you avoid any interruptions in your workflows, especially when connecting real estate APIs.
Required Accounts and Tools
Start by setting up a Make.com account. The platform offers a free tier, which is perfect for testing automation workflows without any upfront commitment. This is a great way for real estate professionals to explore its potential before upgrading to a paid plan.
Next, you’ll need access to the BatchData API and your API key. This key is vital – it acts as your security credential and must be included in the "Authorization" header for every API call. Familiarize yourself with the API endpoints you’ll be using, such as Property Search, Property Lookup, or Skip Trace. Each endpoint serves a specific purpose, so knowing their parameters and applications will save you time.
A basic understanding of JSON is also helpful. This knowledge makes it easier to parse API responses and map data within Make.com workflows. If you’re planning to receive real-time updates, consider setting up a webhook URL, though this step is optional for most scenarios.
| Requirement | Description |
|---|---|
| Make.com Account | Enables you to create and manage scenarios. |
| BatchData API Key | Required for API call authorization. |
| API Endpoints | URLs for tasks like Property Search or Skip Trace. |
| JSON Knowledge | Helps with parsing structured API responses. |
| Webhook URL | (Optional) Receives real-time updates from APIs. |
Getting Your BatchData API Key and Documentation

To get started, log into your BatchData account and locate the API settings or developer section. Here, you’ll find your API key – copy it and store it securely, as you’ll need it for authentication. Keep in mind that BatchData uses a pay-as-you-go pricing model, so you’ll only pay for the data you actually use.
The BatchData API documentation is another critical resource. It provides detailed information about available endpoints, required parameters, response formats, and authentication methods. You’ll also find sample API calls, example JSON responses, and error codes to help troubleshoot any issues. Bookmark this page – it will become an invaluable reference as you build your initial workflows. Additionally, make sure you understand how to create, verify, and reauthorize connections within Make.com to keep your data flowing smoothly.
Step 1: Create a New Scenario in Make.com
To get started, log into Make.com and click on "Create a new scenario." This will open the scenario editor, a visual workspace where you can design your automation by linking various modules together.
Setting Up Your Workflow
In the scenario editor, you’ll notice a large "+" button in the center. This is where you’ll add your first module, which serves as the trigger to kick off your automation. Start by giving your scenario a clear and descriptive name, like "BatchData Property Search to Google Sheets." Naming your scenarios upfront helps keep things organized as your list of automations grows.
Now, it’s time to choose your trigger. You have several options:
- Webhook: Ideal for real-time data updates.
- Scheduled Trigger: Perfect for automations that run periodically.
- HTTP Module: Best for manual API calls.
For most real estate workflows, a Scheduled trigger strikes a good balance between efficiency and timeliness.
"A scenario is a series of modules that indicate how data should be transferred and transformed between apps/services." – Make Help Center
Keep in mind that Make.com only allows one trigger per scenario. If your automation requires multiple triggers, you’ll need to create separate scenarios. A well-organized scenario is key to ensuring smooth API integrations and effective real estate data management.
Once your scenario is ready, you can proceed to Step 2, where you’ll connect the BatchData API and set up authentication.
Step 2: Connect the BatchData API
Once your scenario is set up, click the "+" button and select the HTTP module’s "Make a request" option. This will allow you to connect to BatchData’s property search, skip tracing, and enrichment APIs.
Adding the API Endpoint and Authentication
In the URL field, enter the specific BatchData API endpoint you need. For example, use https://api.batchdata.io/api/v1/property/search for property searches or /api/v1/property/lookup for detailed address lookups.
Next, configure the authentication. In the Headers section, click "Add item" twice to include two headers:
- For the first header, set the key to
Authorizationand the value toBearer YOUR_API_KEY(replaceYOUR_API_KEYwith your actual BatchData API key). - For the second header, set the key to
Content-Typeand the value toapplication/json.
As Dimitris Kamaritis, Solutions Architect at Make, highlights:
"The ‘Make an API call’ module is a door to API functions that are not available as standalone Make app modules".
Setting Up API Parameters
Set the HTTP Method to POST and input your JSON search parameters into the Body field. For instance, you might use something like this:
{ "city": "Austin", "state": "TX", "min_equity_percent": 50 } You can refine your search by adding filters such as bedrooms, max_year_built, or square_footage. If your data comes from another module – like a spreadsheet row or a webhook – you can use Make’s variable mapping feature to insert dynamic values instead of static ones.
Once everything is configured, click "Run once" to test your setup. A successful connection will return a 2xx status code in the output bubble, confirming that the API is working correctly.
Step 3: Map Data Inputs and Outputs
This step ensures your input data aligns perfectly with the API’s requirements and that the outputs are processed and ready for the next steps in your workflow.
With your BatchData API connected, it’s time to map the trigger data to the API parameters and handle the output. Mapping connects the output from one module to the input of the next, creating a seamless flow of data.
Connecting Input Triggers
Begin by adding a trigger module at the start of your scenario. A common choice for real estate workflows is the Google Sheets > Watch Rows module. This module monitors your spreadsheet for new entries and automatically forwards that data to BatchData. Select your Google Sheets account, then specify the spreadsheet and worksheet you want to monitor.
Once the trigger is configured, open the mapping panel in the BatchData API module’s Body field. You’ll see "data pills" representing each column from your spreadsheet, such as Address, City, State, or ZIP Code. Simply click on these pills to insert them into the JSON parameters. For instance, if your spreadsheet includes property address details, your Body might look like this:
{ "street": {{1.Address}}, "city": {{1.City}}, "state": {{1.State}}, "zip": {{1.ZIP}} } To ensure accuracy, refer to the BatchData API documentation for the exact parameter names.
Parsing API Responses
Once the API call is made, Make.com will automatically parse the JSON response into data pills. If the response includes an array, you can add an Iterator module to process each item individually. For workflows that need to combine multiple responses before sending the data to tools like Google Sheets or a CRM, use an Aggregator module to consolidate the information.
Enable the "Parse response" option in your API module settings. This converts the JSON output into data pills automatically. You can then drag these values into fields for modules like "Google Sheets > Add a Row" or "Airtable > Create Record" to store the enriched property data.
Once everything is mapped and parsed, you’re ready to move on to integrating the outputs with your final data destination in the next step.
Step 4: Add Data Processing and Enrichment
Once you’ve mapped your data, it’s time to transform those basic records into actionable leads. This step involves using additional BatchData APIs to enrich property records with verified contacts and detailed insights, making your data ready for immediate use.
Using Enrichment APIs
To enhance property data, chain multiple API calls. Start by retrieving property details, then use BatchData’s Skip Trace API to add verified owner contacts like phone numbers and email addresses to each record. This turns static property information into a dynamic, outreach-ready pipeline. By chaining these API calls in a single workflow, you maximize the value of each property record.
For more complex endpoints, Make’s AI Assistant can help by auto-generating HTTP configurations based on BatchData examples. If the Skip Trace API returns multiple phone numbers or email addresses for a single owner, include an Iterator module right after the API call. This ensures each contact is processed individually. To further improve efficiency, add a phone verification step to filter out invalid numbers before they’re sent to your CRM, saving time and reducing wasted outreach.
| API Endpoint | Primary Purpose in Workflow | Key Data Outputs |
|---|---|---|
| Property Search | Discovering new leads | Address, Parcel ID, Equity, Market Value |
| Skip Trace | Adding contact information | Owner names, Phone numbers, Email addresses |
| Phone Verification | Ensuring data accuracy | Verified phone status, Line type |
With these enriched records in hand, you’re ready to store and share the data effectively.
Storing and Sharing Results
After enriching your records, the next step is to upload them to their final destination. Use modules like Google Sheets > Bulk Add Rows or Airtable > Create Record to store the data. The Bulk Add Rows option is especially efficient because it batches multiple records into a single action, saving Make operations and improving overall performance. Be sure to map each API output – like ownerName, verifiedPhone, or totalMarketValue – to the appropriate column in your spreadsheet or CRM fields. This ensures your team has immediate access to the enriched data.
If your workflow involves combining multiple enriched records, use an Array Aggregator module before the storage step to consolidate everything into one batch. To keep your team in the loop, set up automated notifications through Slack or email. This way, everyone knows as soon as new enriched leads are available and can act on them right away.
Step 5: Test and Activate Your Automation
Before setting your real estate data flow on autopilot, it’s essential to double-check every connection and data flow. Testing ensures that any setup issues are caught early, while activation keeps your scenario running seamlessly without the need for constant manual input.
Testing Your Workflow
Start by clicking "Run once" to manually test your setup. This step sends a live request to the BatchData API and processes it through each module you’ve configured. Pay attention to the output bubbles above each module – they display the exact data that flows through. By clicking on these bubbles, you can review the raw JSON response to confirm it includes the expected property details, owner names, or verified phone numbers.
If you see a red exclamation mark, it signals an issue. Common culprits include incorrect endpoint URLs, missing parameters, or insufficient API permissions. To troubleshoot, go to the "Connections" tab and click "Verify" next to your BatchData connection. A green checkmark confirms your API key is valid. If verification fails, use the "Reauthorize" option to refresh the connection without having to rebuild your modules. Double-check the BatchData API documentation to ensure your relative URL path, request method (GET or POST), and query parameters are all correct.
"When an integration falters, it’s rarely a problem with Make.com itself, but rather a misinterpretation of API documentation, an oversight in configuration, or a challenge in managing the dialogue between two distinct software systems." – Jeff Arnold, Founder, 4Spot Consulting
Testing doesn’t end with Make’s internal logs. Open your Google Sheet or CRM to confirm that the enriched real estate data has been placed in the correct columns. Keep in mind that each test run uses up one credit from your Make account.
Once you’re confident the outputs are accurate, you’re ready to activate your automation.
Activating and Monitoring
After successful testing, activate your scenario by toggling the scheduling switch to "ON". This enables live automation, which will now run based on the trigger you’ve set – whether it’s a scheduled interval, a new spreadsheet row, or an incoming webhook. Keep an eye on your automation’s performance through the "Scenario history" to spot any occasional errors.
Be aware that OAuth 2.0 tokens can expire over time, which may disrupt your scenario. If your automation stops unexpectedly, check the "Connections" tab for expired tokens or "insufficient scope" errors. These errors usually mean your API key doesn’t have the needed permissions for a specific resource. Updating the connection in "Credentials" will automatically apply the changes to all modules in your scenario.
Conclusion
This integration shows how real estate professionals can use Make.com’s advanced API capabilities to transform how they manage property data. By following these five steps, you’ve automated the process of retrieving property information, eliminating the need for manual research and replacing it with instant, dependable insights.
The benefits go beyond saving time. With continuously updated data, your leads always have access to accurate property details. Plus, your workflows can scale seamlessly, handling property inquiries without increasing staff or labor costs. Whether it’s adding equity data to leads, skip tracing owner contact details, or tracking market changes in real time, your CRM and marketing tools are constantly fed with actionable intelligence – automatically.
Start small with a pilot workflow – perhaps focusing on a single zip code – to measure results before scaling up. Take advantage of Make.com’s scheduling tools to stay within API rate limits, and keep an eye on your BatchData dashboard to track usage and fine-tune your queries. As Grace Ashiru wisely said, "Automation isn’t just a tech luxury, it’s a smart business strategy." These early efforts provide the foundation for expanding your automation system.
With your data pipeline now live, your sales team receives verified phone numbers, property details, and financial histories as soon as opportunities arise. This proactive approach replaces guesswork with precise targeting, helping you connect with homeowners who have high equity or specific property features – often before your competitors are even aware of them. Keep evaluating your system’s performance and refining workflows to get the most out of your automated data intelligence.
FAQs
How do I keep my BatchData API key secure in Make.com?
To keep your BatchData API key safe in Make.com, it’s a good idea to store it as an environment variable instead of embedding it directly in your code. This way, if your scenario code gets shared, your key remains protected from unauthorized access. Use the variable in your modules to securely handle authentication.
For added security, ensure you set up proper access controls and make it a habit to rotate your API keys regularly. These steps can significantly lower the chances of security breaches.
What should I do if my Make.com scenario hits an API rate limit or times out?
If your Make.com scenario encounters an API rate limit or times out, error handlers can help you manage the situation effectively. Set up automatic retries to address incomplete executions and ensure smoother operation. It’s also a good idea to monitor your API usage regularly to avoid hitting those limits in the first place. Implementing throttling can help regulate the flow of requests and prevent overloads. Lastly, dive into the API documentation to understand error codes and follow recommended practices for managing rate limits and timeouts.
How can I dedupe and format BatchData results before sending them to my CRM or Google Sheets?
To clean up and format BatchData results effectively, here’s what you need to do:
- Remove duplicates: Use data cleaning tools or built-in automation features to eliminate duplicates and maintain accurate records.
- Standardize formatting: Ensure consistency by normalizing key fields like addresses (USPS-compliant formats), dates (MM/DD/YYYY), currency (USD), and sizes (measured in square feet).
- Validate and enrich data: Fix inconsistencies, fill in missing information, and verify accuracy before importing the results into your CRM or Google Sheets.
These steps will help ensure your data is clean, consistent, and ready for use.


